Customizing JWT Session in NextAuth: A Practical Guide to Adding custom User Data


Whenever I use NextAuth for authentication with NextJS, I waste a ton of time trying to figure out how to add extra data to the user session (role, status, isBanned ...) to be able to access it directly from the session whenever calling useSession() hook on the client side or getServerSession(req,res, authOptions) on the server side. And whenever I go through Stack Overflow or Github issues I find a ton of devs struggling with that and no answer is direct to the point so I decided to document this for everyone, to remove that dark side of handling JWT session data appending on NextAuth
First I'd like to point out how NextAuth flow works using this simple illustration:


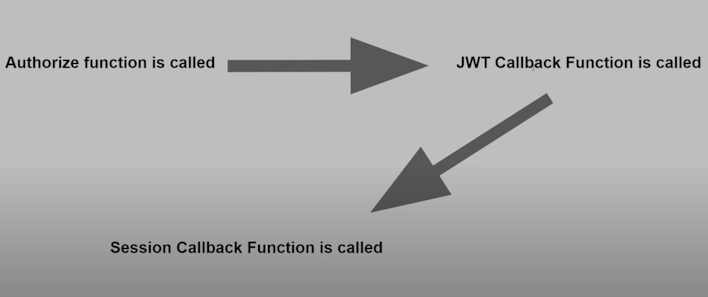
So when I try to login to my application authorize() callback function is where the logic is for when a user logs in to make sure they're authorized to login, Now since we're talking about JWT I assume you are already marking your provider to use JWT as the session strategy like so session: {strategy: "jwt",} in the NextAuth options, then the jwt() callback function will be called just after the authorize() cb function and right after that the session() callback is called right after that.
Let's get to the code, First thing and right from the NextAuth documentation this is the initial implementation of NextAuth credentials provider
1import CredentialsProvider from "next-auth/providers/credentials"2...3session: {4 strategy: "jwt",5},6providers: [7 CredentialsProvider({8 // The name to display on the sign in form (e.g. "Sign in with...")9 name: "Credentials",10 // `credentials` is used to generate a form on the sign in page.11 // You can specify which fields should be submitted, by adding keys to the `credentials` object.12 // e.g. domain, username, password, 2FA token, etc.13 // You can pass any HTML attribute to the <input> tag through the object.14 credentials: {15 username: { label: "Username", type: "text", placeholder: "jsmith" },16 password: { label: "Password", type: "password" }17 },18 async authorize(credentials, req) {19 // Add logic here to look up the user from the credentials supplied20 const user = { id: "1", name: "J Smith", email: "jsmith@example.com" }2122 if (user) {23 // Any object returned will be saved in `user` property of the JWT24 return user25 } else {26 // If you return null then an error will be displayed advising the user to check their details.27 return null2829 // You can also Reject this callback with an Error thus the user will be sent to the error page with the error message as a query parameter30 }31 }32 })33]34...
Added session: {strategy: "jwt",} to make sure we're in the same page.
Let's clean up the comments a bit and write a more real-world scenario for the authorize() callback function:
1import CredentialsProvider from "next-auth/providers/credentials"23export const authOptions = {4 ...5 session: {6 strategy: "jwt",7 },8 providers: [9 CredentialsProvider({10 name: "Credentials",11 credentials: {12 username: { label: "Username", type: "text", placeholder: "jsmith" },13 password: { label: "Password", type: "password" }14 },15 async authorize(credentials {16 if (!credentials.username || !credentials?.password) {17 throw new Error("Incorrect credentials")18 }1920 // service can be your db client or whatever to fetch user by username21 const user = await service.findUserByUsername(credentials.username)2223 // assuming you're encrypting your password in db 🫣 using bcrypt24 if (user && bcrypt.compareSync(credentials.password, user.password)) {25 return {26 // default data we get from session27 name: user.name,28 email: user.email,29 image: user.image,30 // our data we want to append to the session object31 id: user.id,32 username: user.username,33 role: user.role,34 isBanned: user.isBanned,35 // ...36 }37 } else {38 throw new Error("No user matches the provided credentials in our database")39 }40 }41 })42 ]43 ...44}
Line: 15 Now that our authorize() cb function is more clear and that we return from it the data needed to fill in the session object.
as I demonstrated in the illustration above the returned that from authorize() cb function will go directly to jwt() cb function and its going to look like that:
1import CredentialsProvider from "next-auth/providers/credentials"23export const authOptions = {4 ...5 session: {6 strategy: "jwt",7 },8 callbacks: {9 jwt: ({token, user, profile, account, isNewUser}) => {10 return token11 }12 },13 providers: [14 CredentialsProvider({15 name: "Credentials",16 credentials: {17 username: { label: "Username", type: "text", placeholder: "jsmith" },18 password: { label: "Password", type: "password" }19 },20 async authorize(credentials {21 if (!credentials.username || !credentials?.password) {22 throw new Error("Incorrect credentials")23 }2425 // service can be your db client or whatever to fetch user by username26 const user = await service.findUserByUsername(credentials.username)2728 // assuming you're encrypting your password in db 🫣 using bcrypt29 if (user && bcrypt.compareSync(credentials.password, user.password)) {30 return {31 // default data we get from session32 name: user.name,33 email: user.email,34 image: user.image,35 // our data we want to append to the session object36 id: user.id,37 username: user.username,38 role: user.role,39 isBanned: user.isBanned,40 // ...41 }42 } else {43 throw new Error("No user matches the provided credentials in our database")44 }45 }46 })47 ]48 ...49}
Line: 9, that's its default behavior it just returns the JWT token we're using during the current session and it's stored in a cookie.
The token param is always available but others like user, profile, account and isNewUser are only available the first time the user logs in so whenever its called next (eg. Requests to /api/auth/signin, /api/auth/session and calls to getSession(), getServerSession() and useSession()callbacks) we're going to lose the user we just built on authorize() cb, therefor we're going make sure to override the token user object when first the user logs in so that we can access it in the session() cb later, as following:
Note: From now on I will be just updating the callbacks option so it s what I will be highlighting in the code snippets to make it more readable
1...2callbacks: {3 jwt: ({token, user, profile, account, isNewUser}) => {4 if(user) {5 return {...token, ...user}6 }7 return token8 }9}10...
In this way we made sure on first login we are going to append the user data we got from authorize() callback to the token data else we gonna just return the JWT token.
Now let's access that token on the session() callback and extract our user data from it.
12...3callbacks: {4 jwt: ({token, user}) => {5 if(user) {6 return {...token, ...user}7 }8 return token9 },10 session: ({session, token}) => {11 return {12 ...session,13 user: {14 ...session.user,15 id: token.id,16 name: token.name,17 email: token.email,18 username: token.username,19 image: token.image,20 role: token.role,21 isBanned: token.isBanned22 }23 }24 }25}26...
And that's it 🎉 Like that we've added extra data to our session object the first time the user logs in by passing it by from authorize() cb through jwt() cb to our session() cb that build the session object we're going to have hands on whenever we call useSession() hook on the client side or getServerSession(req, res, authOptions) on the server side.